The Pilot Spot Belsazar Uriarte: Fly Wing UH-1 Huey V4 That Makes Flying Easy and Fun
Share
Hello Team,
I had the great pleasure of meeting the folks from Fly Wing during the RC Convention at the Pomona Fairplex. Shortly after I got to fly their beautiful Bell 206 LAFD model, the UH-1 Huey and their FW450. All are 450 class ready-to-fly models with GPS infused flight controllers for ease of use and stability.
The FW450 and UH-1 Huey were displayed during our May meeting and here is my review and thoughts on the UH-1 helicopter so far. I will start off by saying that I have flown smaller helicopters that were all stabilized in one way or another but nothing like the Fly Wing models. I do admit I never had the opportunity to get comfortable enough to fly a traditional helicopter but I am getting closer to that goal.
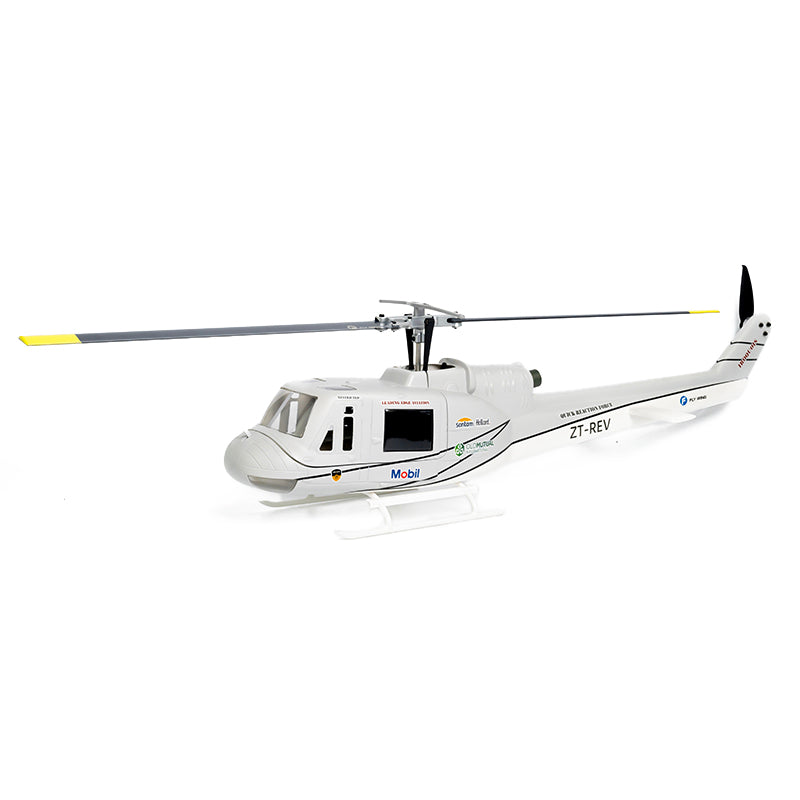
Out of the box the Fly Wing UH-1 came ready to fly with a high quality 4S 3,000 mAh lipo battery (XT60), tool set, 3D printed accessories, bind plug, 6 channel receiver, all metal servos, 60 amp ESC (rated up to 6 cell), 3 amp balance port charger, H1 Flight Controller, USB-C cable, Velcro strap and remote control. The only thing missing was the 4 AA batteries for the remote.
I used the supplied charger for a little over an hour and the battery was ready to go. Using the supplied tool set, I installed the carbon fiber blades to the metal rotor head. The blades fit tight on the rotor blade grip. The company Tech suggested using a flat blade to carefully remove the thin layer of paint on the top of the blade to get a good fit. This “fix” unknow to me at that time made me resort to the tools I had at my disposal to split apart the rotor’s blade grip just enough to get the blades snugly secured. I also noticed you need to be careful with the locking nuts as they can come out if you don’t place your finger underneath while tightening the screw used to secure your blades.
I opted not to add/glue any of the other 3D parts aside from the stabilizer bar (not required for flight – just for a scale look). With the remote on I began the simple sequence to initiate the heli. I selected the GPS flight mode via the toggle switch of the remote and connected the battery to the ESC. There is a startup sequence the heli follows and lasts a few seconds. I waited for the GPS signal to be acquired and locked in (solid green). This process takes anywhere from 1-4 minutes depending on the location and any obstacles in the area. Once locked in I proceeded to initiate the heli, no other calibration required. Using a downward and outward motion on both sticks for about 5 seconds… I flip the toggle switch to the run position and the electric tail rotor starts up followed by the main rotor. Once spooled up I gently push up on the left stick and bring it to a hover at about 10 feet above the ground.
The gusting wind at the field put the GPS and the H1 Flight Controller to work on the UH-1. It compensated accordingly and maintained its position without any issues. Hands off flying is possible and demonstrated by its smooth and effortless hovering motion. It takes little effort to start flying this thing. Getting to know the flight characteristics is a matter of hovering in place and moving the sticks in a smooth manner. Right stick input for directional forward/backwards flight and left/right input to slide to each side. Left stick up/down to control the altitude and left/right to control the yaw and general direction of flight for the helicopter.
It flew smooth as long as you maintained constant input on the controls. If you release the sticks to a center position the helicopter immediately came to a halt, not a bad thing when learning how to fly but something to take into consideration when flying in GPS mode. As you all must already know, keep the helicopter at a safe altitude and away from objects that could come in contact with the rotor blades. The blades spin at about 1,500 rpm and can cause significant damage.
The manufacturer states the flight time is approximately 20 minutes with the stock battery and the UH-1 hit the mark. Flying across the hot field in a full forward attitude and somewhat aggressive turns I was getting the 3D heli guys upset as they watched me fly for quite a long time. I was about to bring it in and take a break when the low voltage “return to home” setting kicked in. This autonomous feature commonly reserved for drones brought the heli back to the ground safely without any input on my end. I do want to point out there is no obstacle avoidance and you must make sure the return path is free and clear. Adjustments can be made but the decent will continue slowly. You can override the RTH (return to home) feature if needed by switching to “Home” then back to “GPS” mode. After this you have about 1 minute of flight time left to safely bring it home.
There are other features on the heli that are nice to have such as circle around a point while the nose is pointed inward, lastly a figure 8 flight path option… all without any input from you. The pre-programmed flight modes are “Home”, “GPS” and “3D”. All can be selected directly via the toggle switch on the remote control. Additional flight modes such as ATT and 6G can be configured and assigned in seconds, no PC required.
The 6G mode allows collective inputs (increase/decrease lift) but keeps the GPS stabilization enabled allowing you to be in control of the direction of the helicopter meaning you won’t flip the heli over BUT can hit the ground if you do not provide enough input to the collective (left stick – up/down). This function was not something I was ready for so I reverted back to the default settings.
The 3D mode removes ALL GPS stability and lets you fly with traditional collective/cyclic inputs. Aside from attempting a loop and a roll at high altitude I have not flown in this mode 100% yet, standby for updates. I do want to provide a WARNING - If you are in GPS mode and flip to 3D mode the helicopter will drop from the air and potentially crash if you are unfamiliar with traditional helicopter inputs. This mode allows you to perform loops and rolls… although not scale like for this heli… it is capable of doing them but don’t expect blazing fast speeds.
As a safety measure I strongly recommend reprograming “3D” mode to “ATT” mode out of the box. This mode maintains the altitude (up/down) using a barometer but will not maintain its position over a particular point on the ground (GPS position lock). The heli will be stable but requires stick input to avoid drift caused by the wind while hoovering/flying. ATT mode or as I call it “butter mode” is great when wanting to replicate scale flying. The heli will no longer stop aggressively when the controls are released to center. The handling and overall motion is fluid and predictable. Small inputs are required to keep the altitude when maneuvering but nothing drastic. This mode is my favorite by far hands down.
Overall:
Fly Wing certainly brought back the fun in flying while not diminishing the art of traditional helicopter flight controls since you have them at a flip of a switch (3D mode). Yes you can call it a heli-drone while in GPS mode but the tech behind the Fly Wing helicopters is a dream come true for EVERYONE that has always wanted to own an RC helicopter and NOT worry about the “RC helicopter” type of problems, maintenance, dangers and skill level requirements. These advancements in technology and ease of use lead the Fly Wing UH-1 Huey V4 to be featured on the June 2025 cover of Model Aviation as winner!
The fiberglass body and payload capabilities of the heli leave plenty of room for customization … including an FPV (First Person View) setup, LED lighting, adding body/cockpit details and so forth. What matters is having fun with your model and sharing the experience with someone else. For those that have seen me at the field and had the chance to take over the controls you know what a relief it is when you can take over and not have to worry about crashing it. This heli allows you to have a fun time while improving your skills with every flight… Progressively building up your confidence and skill level.